
Add/Edit Agreements
The Add Agreement screen allows you to create a new agreement for a customer. Agreements can be created from the Agreements List view or from the Agreements tab on a customer's profile. They can also be created from an existing agreement template by clicking Create from Template.
To edit an existing agreement, open the agreement record and click Edit.
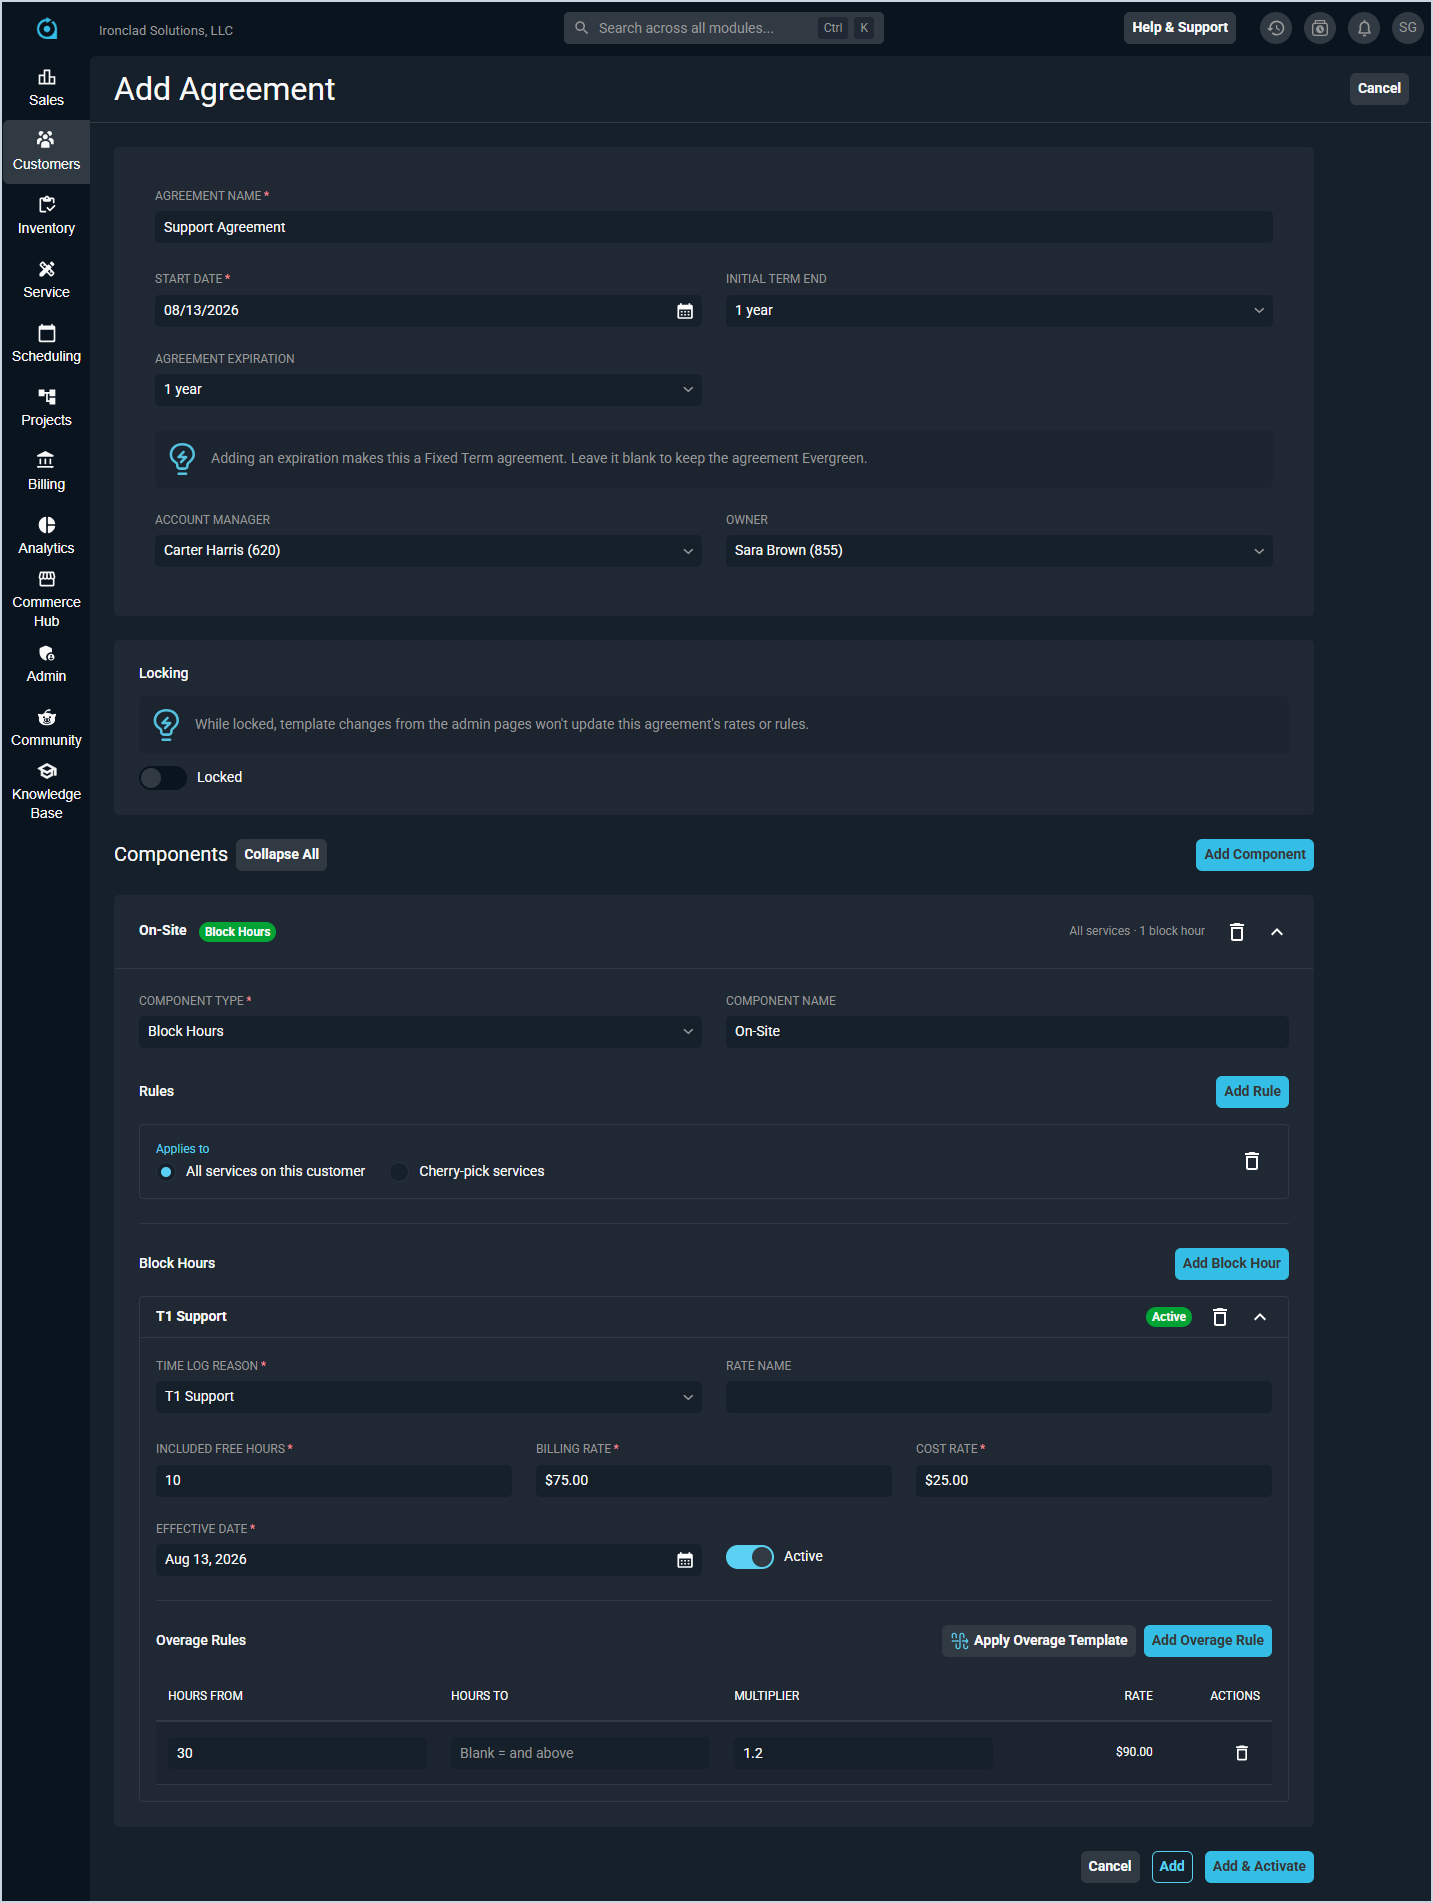
Each field on the Add/Edit Agreement screen is defined below.
| No. | Label | Definition |
|---|---|---|
| 1 | Agreement Name | Name of the agreement. |
| 2 | Start Date | Date the agreement begins. |
| 3 | Initial Term End | Length of the initial term of the agreement. Options include None, 6 months, 1 year, 2 years, and Custom. |
| 4 | Agreement Expiration | How long until the agreement expires. Options include None, 6 months, 1 year, 2 years, and Custom. Adding an expiration makes this a Fixed Term agreement. Leave blank to keep the agreement Evergreen. |
| 5 | Account Manager | User assigned as the account manager for the agreement. |
| 6 | Owner | User assigned as the owner of the agreement. |
Locking
The Locking section controls whether the agreement is protected from template changes. When Locked is enabled, changes made to the agreement template in System Settings will not update this agreement's rates or rules. Locking can also be applied from the ellipsis menu on the Agreements List view.
Components
The Components section displays the components that make up the agreement. Components define the services and billing rules covered under the agreement. Click Add Component to add a new component. Components can be added when creating the agreement or at any time after it has been saved. Click Collapse All to collapse all expanded components.
Each component requires a Component Type and Component Name. The component type determines the fields available in the configuration. The following component types are available.
Recurring
The Recurring component type is used for services billed on a recurring schedule. No additional configuration fields are required beyond the component name and rules.
Time and Materials
The Time and Materials component type is used for billing time and materials against the agreement. Click Add Rate to add a rate. Each rate includes the following fields.
| No. | Label | Definition |
|---|---|---|
| 1 | Time Log Reason | The time log reason this rate applies to. |
| 2 | Rate Name | Optional name for the rate. |
| 3 | Billing Rate | Rate billed to the customer per hour. |
| 4 | Cost Rate | Internal cost per hour. |
| 5 | Effective Date | Date from which this rate is effective. |
| 6 | Active | Indicates whether this rate is currently active. |
Block Hours
The Block Hours component type is used for agreements that include a set number of prepaid hours. Click Add Block Hour to add a block hour rate. Each block hour rate includes the following fields.
| No. | Label | Definition |
|---|---|---|
| 1 | Time Log Reason | The time log reason this block hour rate applies to. |
| 2 | Rate Name | Optional name for the rate. |
| 3 | Included Free Hours | Number of hours included in the block at the base billing rate. |
| 4 | Billing Rate | Rate billed to the customer per hour. |
| 5 | Cost Rate | Internal cost per hour. |
| 6 | Effective Date | Date from which this rate is effective. |
| 7 | Active | Indicates whether this block hour rate is currently active. |
The Overage Rules section defines the billing rate applied when included hours are exceeded. The following actions are available.
- Click Add Overage Rule to manually add an overage tier, entering the hours from, hours to, multiplier, and rate for each tier.
- Click Apply Overage Template to apply a pre-configured overage template. See the System Settings: Agreements - Overage Templates Tab article for more information on configuring overage templates.
One-Time Items
The One-Time Items component type is used for one-time charges included in the agreement. The following options are available.
- Enable Send items to a ticket on activation to automatically send the items to a ticket when the agreement is activated.
- Add items from your product catalog using the Add Item from Catalog dropdown. Each item displays the Description, Quantity, Price, Cost, and a Bill on Renewal toggle that controls whether the item is billed again at each renewal.
Rules
All component types support an optional Rules section that controls which services the component applies to. Click Add Rule to add a rule. Each rule has an Applies to option with the following settings.
- All services on this customer - the component applies to all services on the customer account.
- Cherry-pick services - the component applies only to specific services you select.
A component without rules applies to all services on the customer account.
Click Add to save the agreement, Add & Activate to save and immediately activate it, or Cancel to discard your changes.