
System Settings: Email Settings
The Email section of System Settings allows you to configure how Rev.io sends and receives email across your instance. This includes setting up support inboxes that automatically create tickets from incoming emails, configuring the outbound email addresses that appear as the sender on system-generated and workflow emails, defining rules to filter and quarantine spam, and controlling how inbound email replies behave when they match existing tickets.
| IMPORTANT: Email addresses entered on the Outbound Mailboxes tab must be validated. See the Validating Outgoing Email Addresses article for more information. |
Support Inboxes
Rev.io automatically generates a ticket whenever a monitored email address receives an incoming email. The Support Inboxes tab allows you to configure one or more inbound mailboxes for your support system. Each mailbox can be set up with different routing rules for ticket creation, including the provider, ticket type, and user group to assign when a ticket is created from an incoming email.
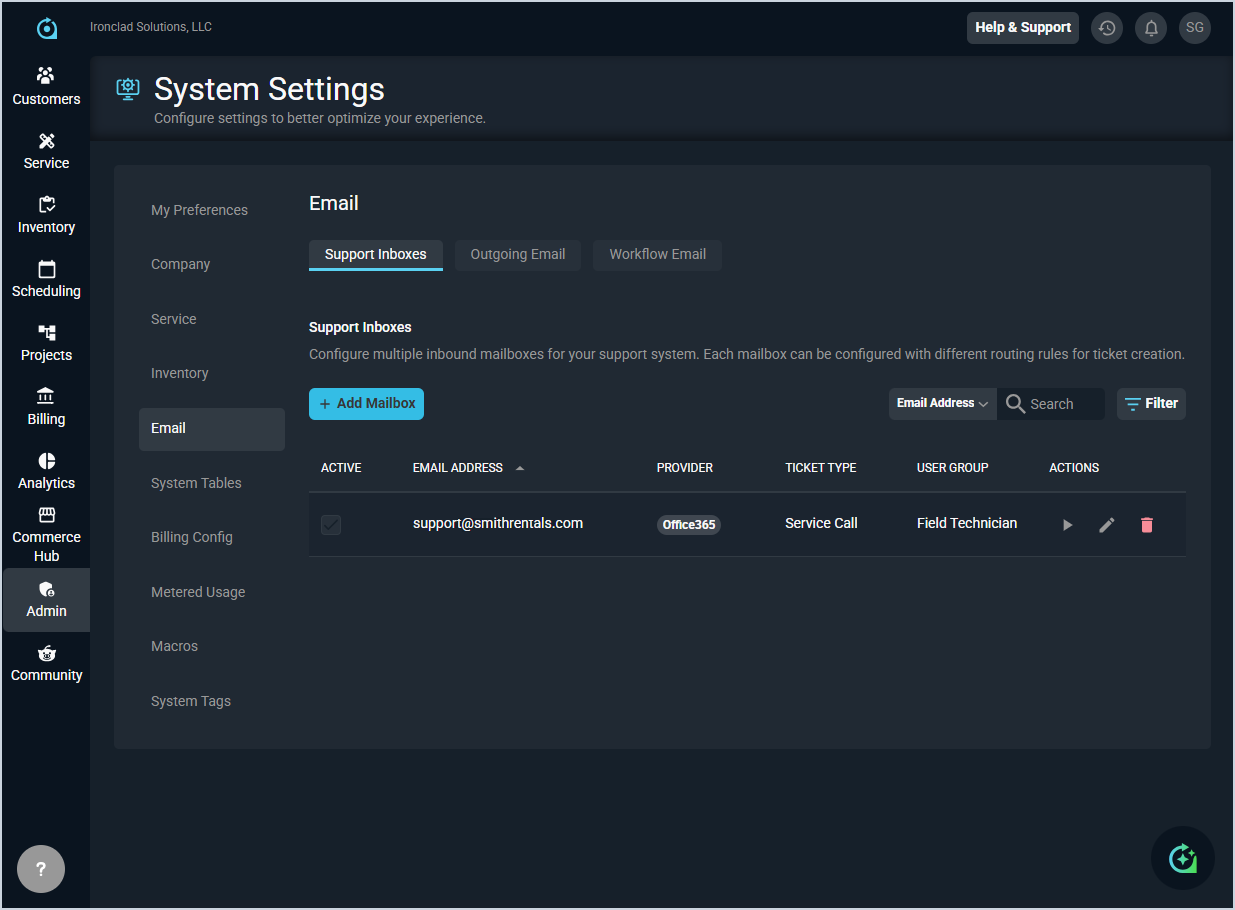
Each field on the Support Inboxes tab is defined below.
| No. | Label | Definition |
| 1 | Active | Indicates whether the mailbox is currently active. |
| 2 | Email Address | The monitored email address where incoming emails will generate tickets. |
| 3 | Provider | The email provider used for the mailbox. Provider options include Office365 and Gmail. |
| 4 | Ticket Type | The ticket type to assign to tickets created from emails received by this mailbox. |
| 5 | User Group | The user group to assign to tickets created from emails received by this mailbox. |
These actions are available on the Support Inboxes tab.
- Add a new support mailbox by clicking the + Add Mailbox button. See the Add/Edit Support Inboxes article for more information.
- Search the mailboxes displayed on this tab by selecting a column from the dropdown and entering text in the Search field.
- Filter the mailboxes displayed on this tab by clicking Filter.
- Test the connection for a mailbox by clicking the play icon at the end of the row.
- Edit a mailbox by clicking the edit icon at the end of the row. See the Add/Edit Support Inboxes article for more information.
- Delete a mailbox by clicking the delete icon at the end of the row.
Inbound Email Options
The Inbound Email Options tab allows you to configure how Rev.io handles inbound email replies, including whether email replies can re-open closed tickets and how incoming emails are assigned to customers.

Each field on the Inbound Email Options tab is defined below.
| No. | Label | Definition |
| 1 | Allow Email Replies to Re-open Closed Tickets | Enables or disables the ability for inbound email replies to re-open closed tickets. |
| 2 | Re-open Window (Days) | Number of days after ticket closure during which an email reply will re-open the ticket. Email replies received outside this window will create a new ticket instead. |
| 3 | Assign Ticket on Email Domain Match | When checked, inbound emails are automatically assigned to a customer based on a matching email domain. |
Outbound Mailboxes
The Outbound Mailboxes tab allows you to configure the name and email address that will display as the sender on emails sent from Rev.io for tickets, purchase orders, and other system communications.
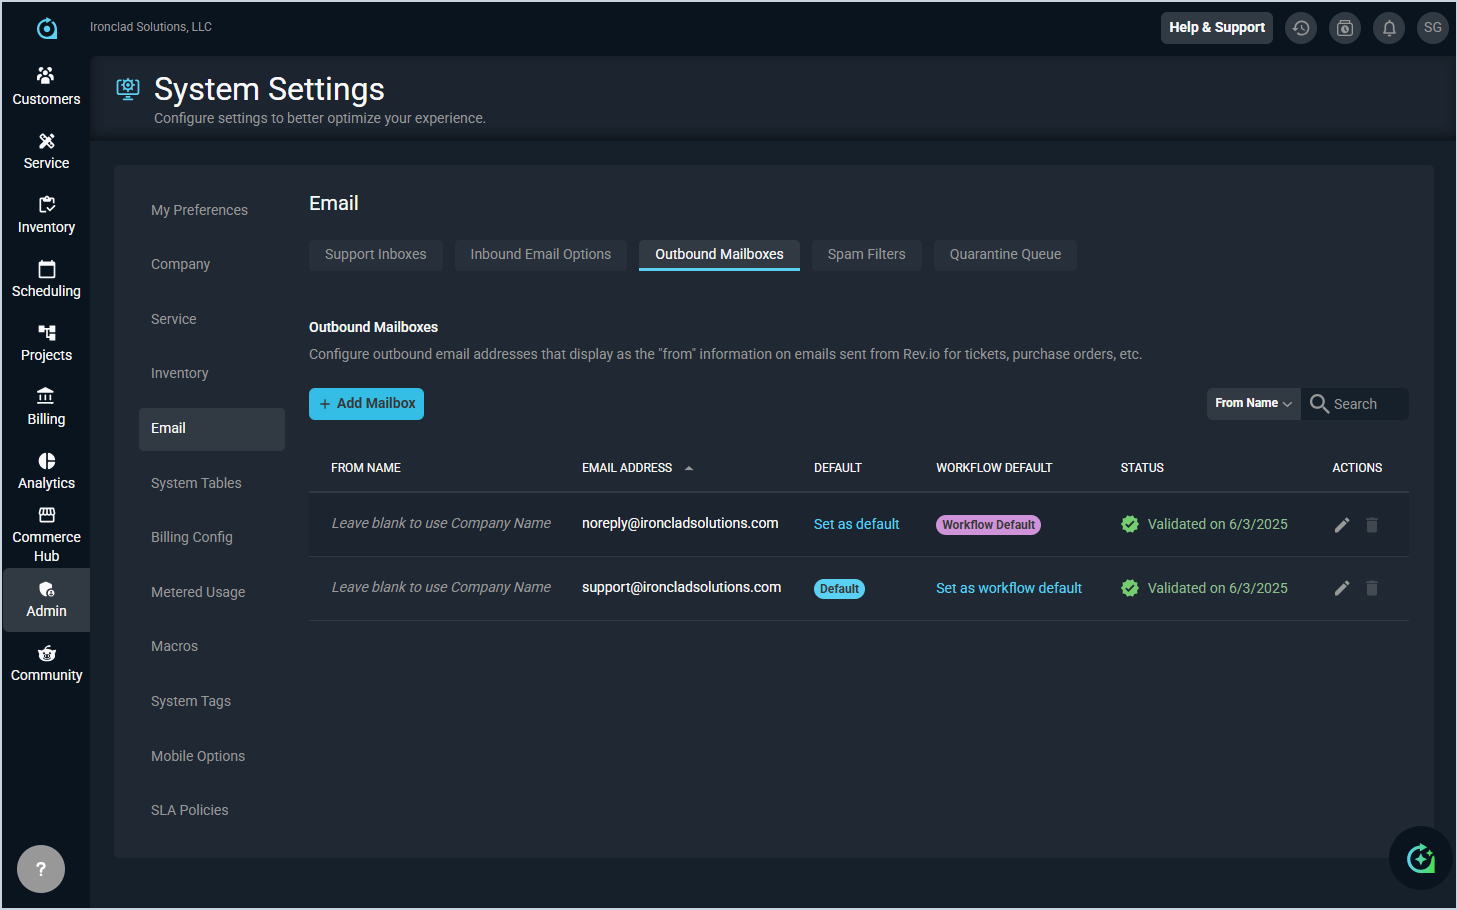
Each field on the Outbound Mailboxes tab is defined below.
| No. | Label | Definition |
| 1 | From Name | Name that will display as the sender on outbound emails. Leave blank to use the company name. |
| 2 | Email Address | The email address that will display as the sender on outbound emails. This address must be validated. See the Validating Outgoing Email Addresses article for more information. |
| 3 | Default | Indicates the default outbound mailbox used for sending emails out of the system, including those for tickets and purchase orders. Click Set as Default to make this mailbox the default. |
| 4 | Workflow Default | Indicates the default outbound mailbox used for workflow-generated emails. Click Set as Workflow Default to make this mailbox the workflow default. See the Create/Edit Workflow Notifications article for more information on building out workflow notifications in Rev.io. |
| 5 | Status | Validation status of the outbound mailbox, including the date the email address was validated. See the Validating Outgoing Email Addresses article for more information. |
The following actions are available on the Outbound Mailboxes tab.
- Add a new outbound mailbox by clicking the + Add Mailbox button.
- Set a mailbox as the default for emails sent out of the system by clicking Set as Default in the Default column.
- Set a mailbox as the default for workflow-generated emails by clicking Set as Workflow Default in the Workflow Default column. See the Create/Edit Workflow Notifications article for more information on building out workflow notifications in Rev.io.
- Search the outbound mailboxes by selecting a column from the dropdown and entering text in the Search field.
- Sort the results in the table by clicking the column label in the table header.
- Edit an outbound mailbox by clicking the edit icon at the end of the row. Clicking the edit icon also allows you to access the Validate button to test the validation for the email address.
- Delete an outbound mailbox by clicking the delete icon at the end of the row.
Spam Filters
The Spam Filters tab allows you to configure rules to automatically filter inbound emails. Matching emails can be quarantined for review or permanently discarded.
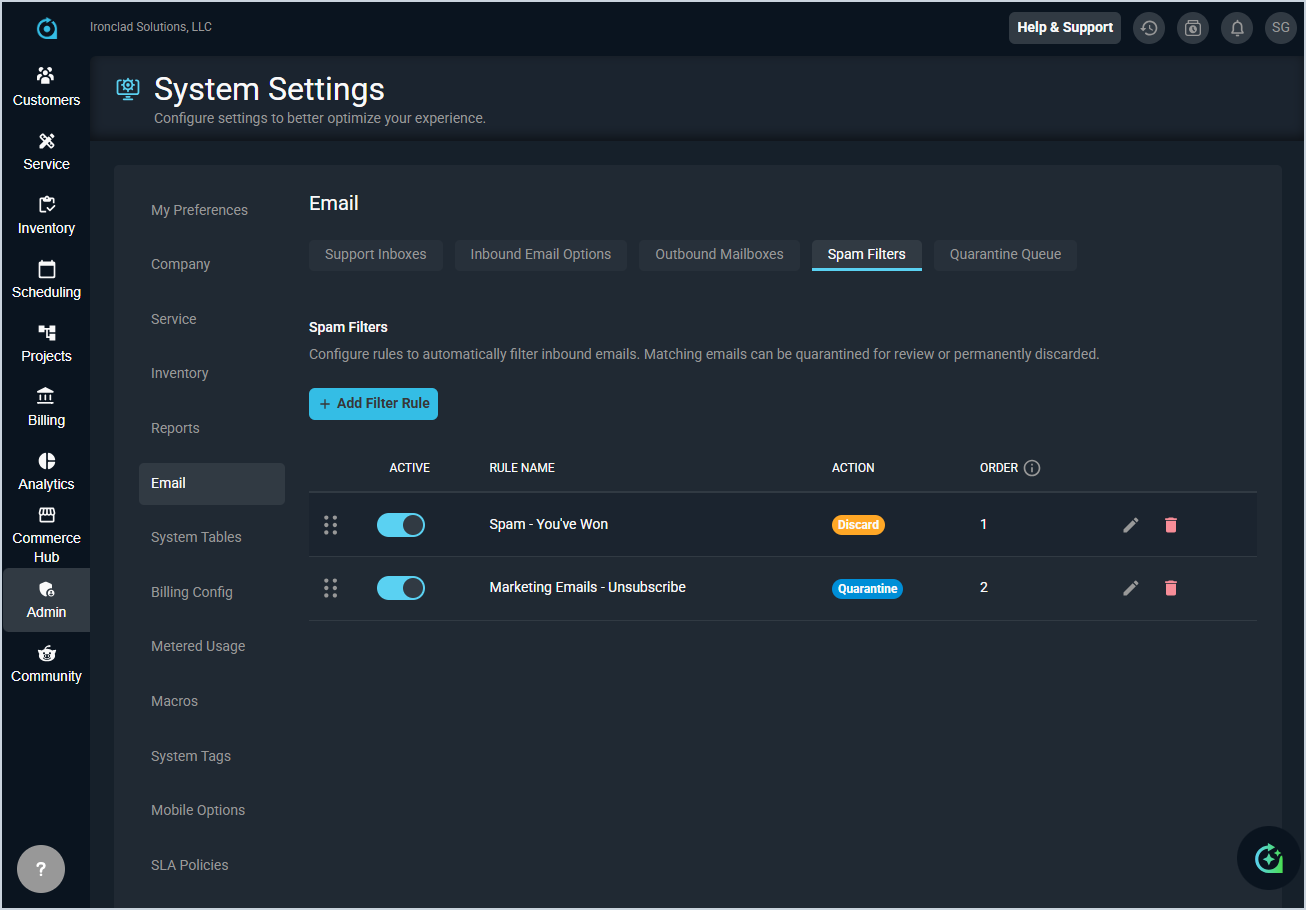
Each field on the Spam Filters tab is defined below.
| No. | Label | Definition |
| 1 | Active | Enables or disables the filter rule. Toggle on to activate the rule. |
| 2 | Rule Name | Name of the spam filter rule. |
| 3 | Action | Action taken when an inbound email matches the rule. Action options include Discard and Quarantine. |
| 4 | Order | Order in which the filter rules are applied. Rules are evaluated in ascending order. |
The following actions are available on the Spam Filters tab.
- Add a new filter rule by clicking the + Add Filter Rule button.
- Enable or disable a filter rule by toggling the Active switch on the rule row.
- Reorder filter rules by clicking and dragging the drag handle at the left of the rule row.
- Edit a filter rule by clicking the edit icon at the end of the rule row.
- Delete a filter rule by clicking the delete icon at the end of the rule row.
Quarantine Queue
The Quarantine Queue tab displays emails that were held by spam filter rules and allows you to review, release, or discard them. Messages in quarantine are automatically discarded after 7 days.
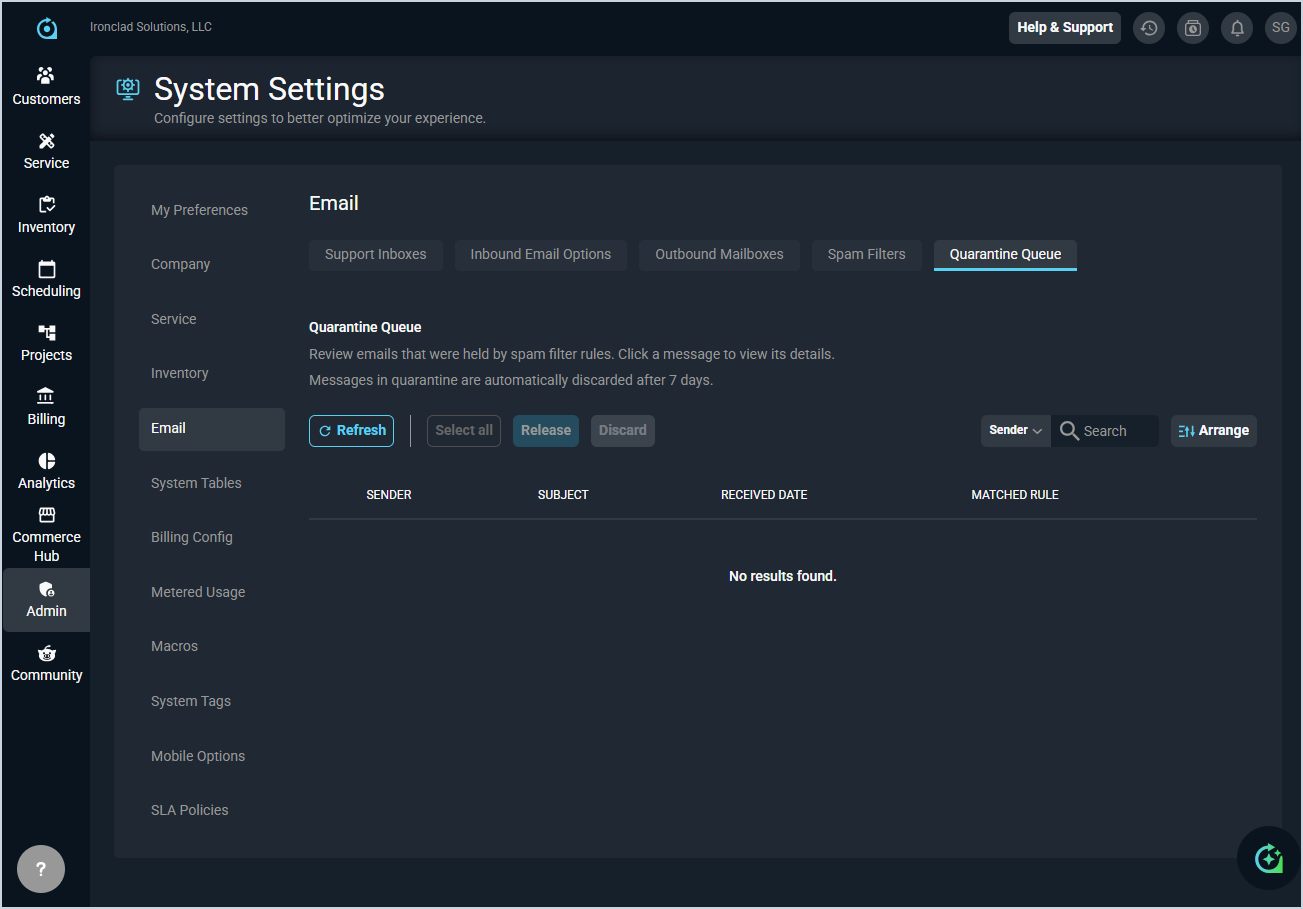
Each field on the Quarantine Queue tab is defined below.
| No. | Label | Definition |
| 1 | Sender | Email address of the sender of the quarantined message. |
| 2 | Subject | Subject line of the quarantined message. |
| 3 | Received Date | Date the quarantined message was received. |
| 4 | Matched Rule | Spam filter rule that caused the message to be quarantined. |
The following actions are available on the Quarantine Queue tab.
- Refresh the quarantine queue by clicking the Refresh button.
- Select all quarantined messages by clicking the Select All button.
- Release one or more quarantined messages to allow them through as normal inbound emails by selecting the messages and clicking the Release button.
- Permanently discard one or more quarantined messages by selecting the messages and clicking the Discard button.
- Search the quarantine queue by selecting a column from the dropdown and entering text in the Search field.
- Customize which columns display in the list view and the order in which they display by clicking the Arrange button.