
Create/Edit SLA Policies
The Create SLA Policy screen allows you to define a new SLA policy for your instance. An SLA (Service Level Agreement) is a defined commitment between a service provider and a customer that sets measurable targets for response and resolution times on support tickets. SLA policies are created using a three-step process: Name & Configurations, Target & Escalation, and Assignments.
| NOTE: New SLA policies are created in a draft status and must be activated before they take effect. To activate an SLA policy, click the ellipsis at the end of the policy row and select Activate. |
Name & Configurations
The Name & Configurations step defines the policy name, status, and the trigger conditions that determine when the SLA clock starts, pauses, resumes, and stops for both first response and resolution.
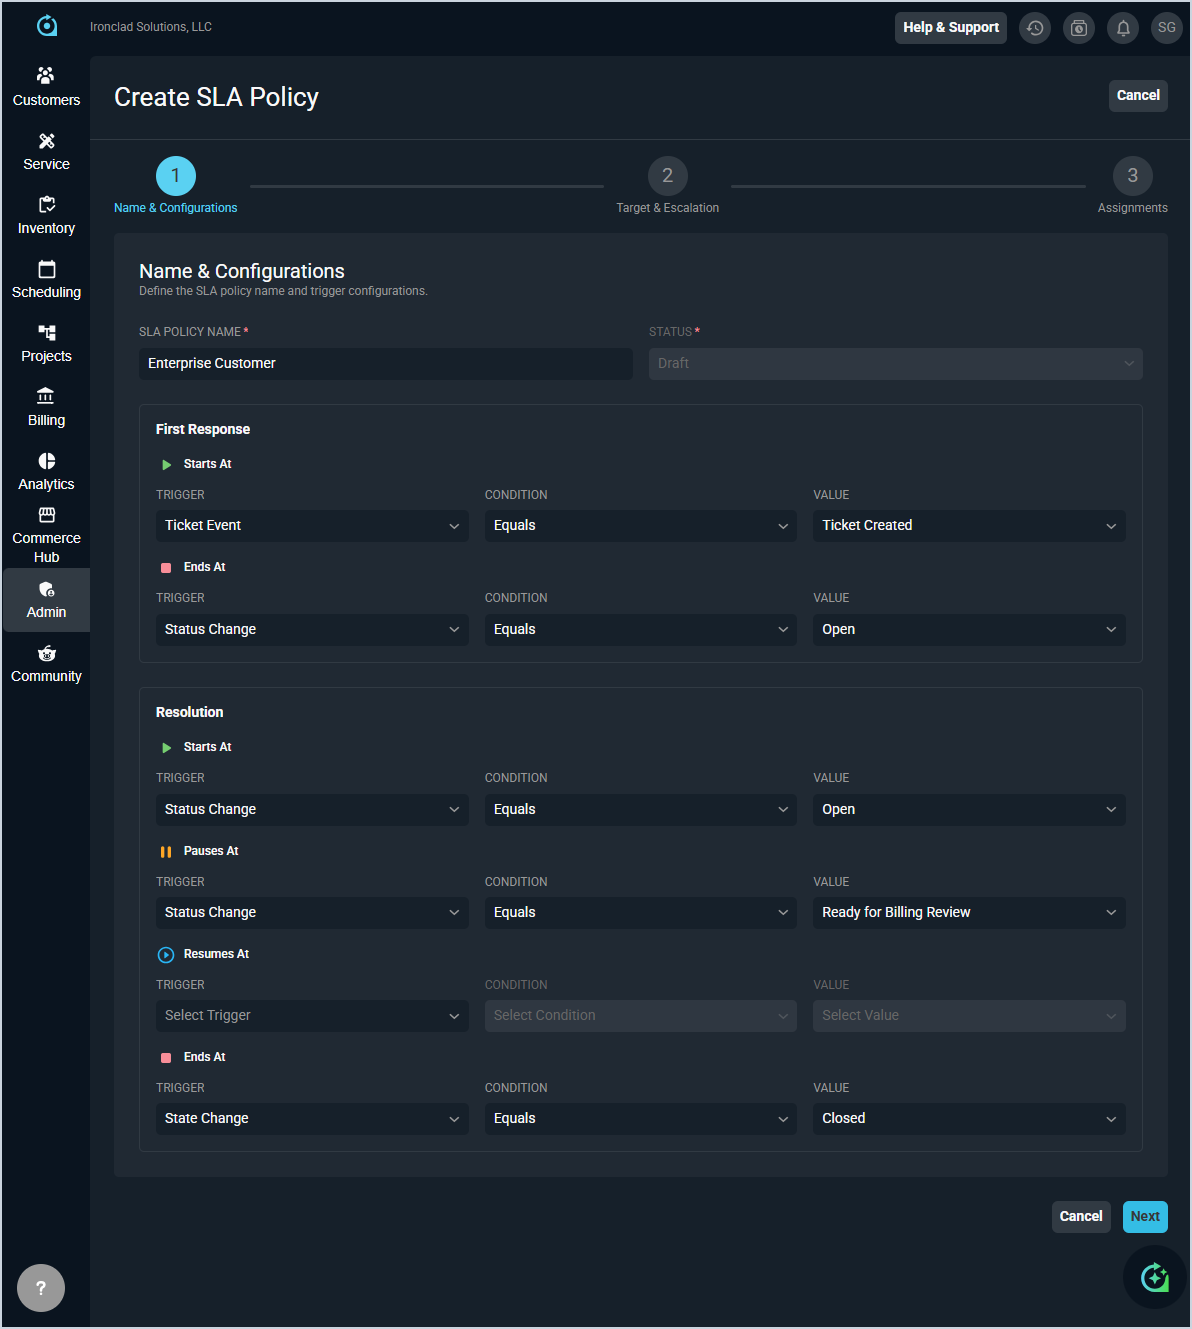
Each field on the Name & Configurations step is defined below.
| No. | Label | Definition |
| Policy Details | ||
| 1 | SLA Policy Name | Name of the SLA policy. |
| 2 | Status | Current status of the SLA policy. Defaults to Draft on creation. |
| First Response | ||
| 3 | Starts At: Trigger | Event that starts the first response SLA clock. |
| 4 | Starts At: Condition | Condition applied to the trigger for the first response start event. |
| 5 | Starts At: Value | Value that the trigger condition must match to start the first response SLA clock. |
| 6 | Ends At: Trigger | Event that stops the first response SLA clock. |
| 7 | Ends At: Condition | Condition applied to the trigger for the first response end event. |
| 8 | Ends At: Value | Value that the trigger condition must match to stop the first response SLA clock. |
| Resolution | ||
| 9 | Starts At: Trigger | Event that starts the resolution SLA clock. |
| 10 | Starts At: Condition | Condition applied to the trigger for the resolution start event. |
| 11 | Starts At: Value | Value that the trigger condition must match to start the resolution SLA clock. |
| 12 | Pauses At: Trigger | Event that pauses the resolution SLA clock. |
| 13 | Pauses At: Condition | Condition applied to the trigger for the resolution pause event. |
| 14 | Pauses At: Value | Value that the trigger condition must match to pause the resolution SLA clock. |
| 15 | Resumes At: Trigger | Event that resumes the resolution SLA clock after a pause. |
| 16 | Resumes At: Condition | Condition applied to the trigger for the resolution resume event. |
| 17 | Resumes At: Value | Value that the trigger condition must match to resume the resolution SLA clock. |
| 18 | Ends At: Trigger | Event that stops the resolution SLA clock. |
| 19 | Ends At: Condition | Condition applied to the trigger for the resolution end event. |
| 20 | Ends At: Value | Value that the trigger condition must match to stop the resolution SLA clock. |
Target & Escalation
The Target & Escalation step defines the response and resolution time targets for each ticket priority level, along with escalation thresholds and the time basis used to measure SLA performance.
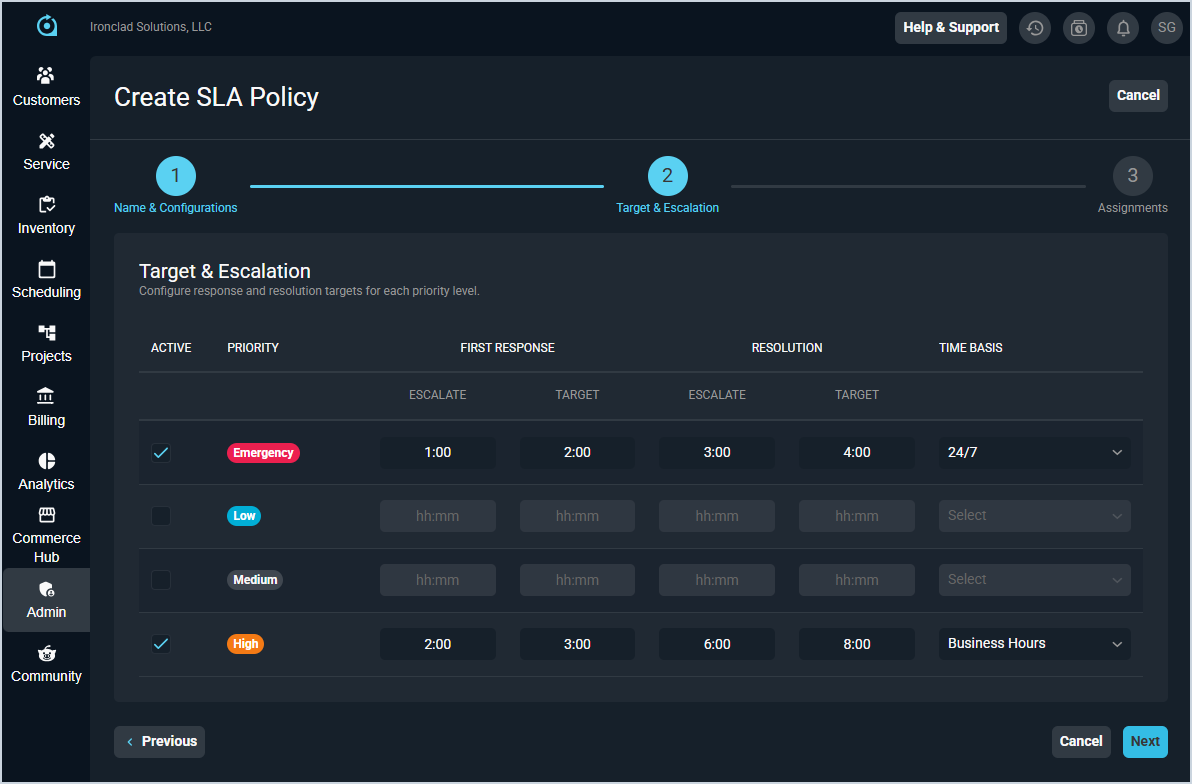
Each field on the Target & Escalation step is defined below.
| No. | Label | Definition |
| 1 | Active | Indicates whether the SLA targets for this priority level are enabled. Check the box to activate targets for a priority. |
| 2 | Priority | Ticket priority level the targets apply to, such as Emergency, Low, Medium, or High. |
| 3 | First Response: Escalate | Time threshold at which the ticket escalates if a first response has not been recorded, in hh:mm format. |
| 4 | First Response: Target | Target time for providing a first response, in hh:mm format. |
| 5 | Resolution: Escalate | Time threshold at which the ticket escalates if it has not been resolved, in hh:mm format. |
| 6 | Resolution: Target | Target time for resolving the ticket, in hh:mm format. |
| 7 | Time Basis | The schedule used to measure SLA time, such as 24/7 or Business Hours. |
Assignments
The Assignments step displays the customers assigned to the SLA policy. Assignments are managed from individual customer records and cannot be edited directly from this screen.
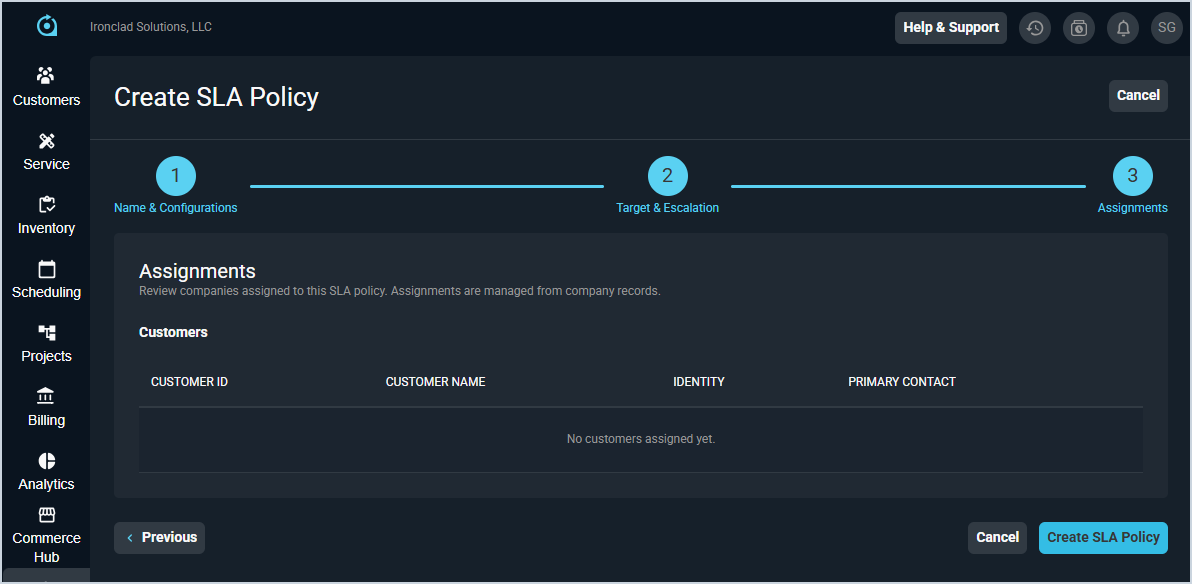
Each field on the Assignments step is defined below.
| No. | Label | Definition |
| 1 | Customer ID | Unique identifier for the customer assigned to the SLA policy. |
| 2 | Customer Name | Name of the customer assigned to the SLA policy. |
| 3 | Identity | Identity associated with the customer record. |
| 4 | Primary Contact | Primary contact on the customer record. |
Available Actions
The following actions are available on the Create SLA Policy screen.
- Navigate to the next step by clicking the Next button.
- Return to the previous step by clicking the Previous button.
- Save the SLA policy by clicking the Create SLA Policy button on the Assignments step.
- Discard changes and return to the SLA Policies list by clicking Cancel.