
Create/Edit Time Logs
The ticket Time Logs tab displays a list of all time logs entered on a ticket and allows you to enter and edit those time logs for your techs. You can only edit existing time logs on tickets if the ticket the time log is tied to hasn't been set to a Closed Status or Sent to Billing.
| Adding a time log marked as Billable on this tab automatically adds a line item to the Parts & Labor tab on the ticket. |
| This article addresses only the top portion of the ticket Time Logs tab where you can add new logs. For information on viewing existing time logs on the ticket, see the View Time Logs article. |
Each field on the ticket Time Logs tab for adding new time logs is defined below.
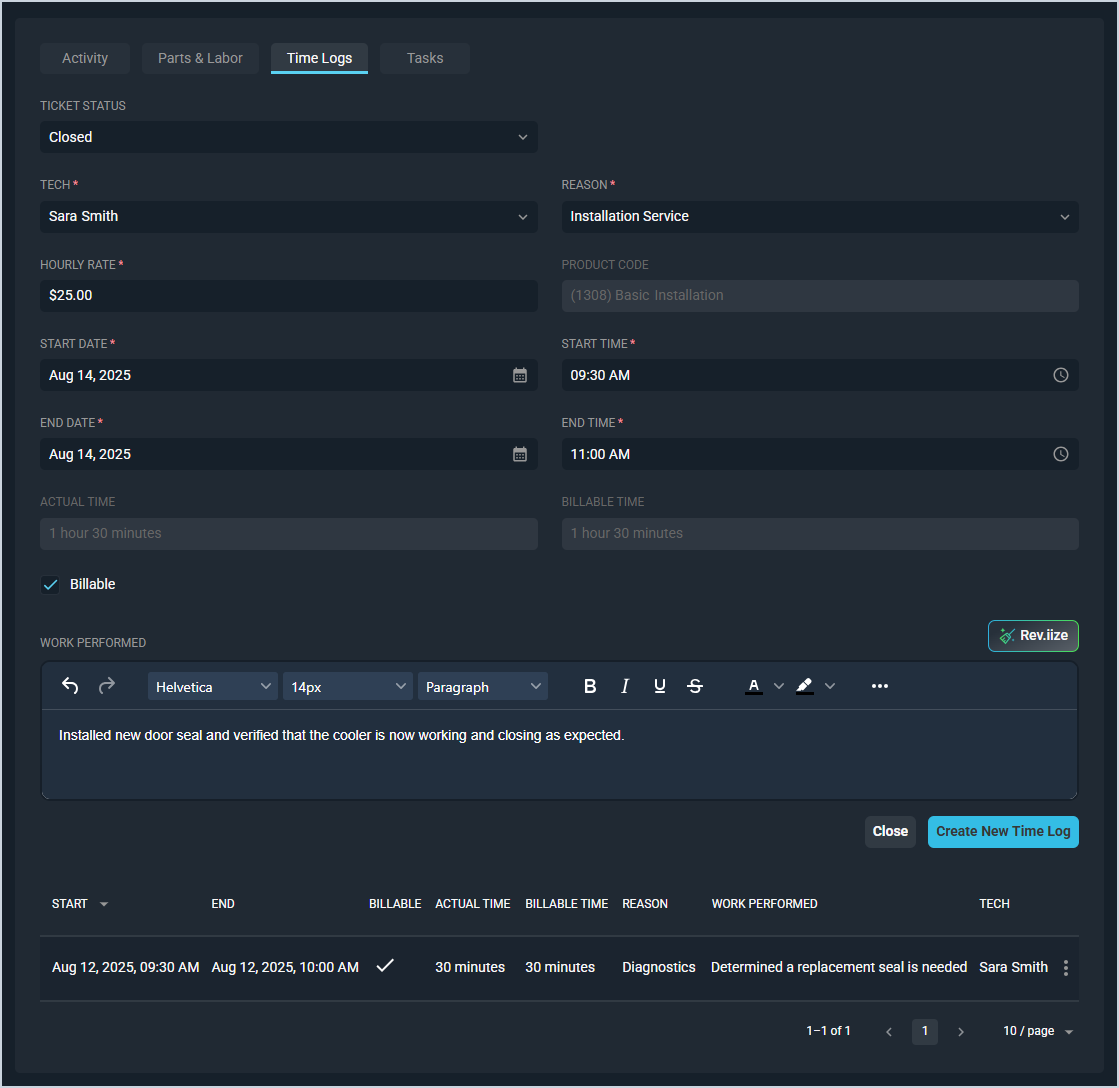
| No. | Label | Definition |
| 1 | Tech | Tech for the time log. |
| 2 | Reason | Reason on the time log. Hourly Rate and Product Code on the time log are tied to the Reason. The Reason also includes rate minimums and rounding. See the System Settings: System Tables - Time Entry article for more information on configuring Reason options. NOTE: Products tied to time log Reasons must be set to a Labor Product Type. |
| 3 | Hourly Rate | Hourly rate for the time log. This field populates based on the Reason selected but can be adjusted manually. |
| 4 | Product Code | Product code for the time log. This field is read-only and populates based on the Reason selected. |
| 5 | Start Date | Start date on the time log. |
| 6 | Start Time | Start time on the time log. |
| 7 | End Date | End date on the time log. |
| 8 | End Time | End time on the time log. |
| 9 | Actual Time | Time in hours and minutes entered on the time log. |
| 10 | Billable Time | Time in hours and minutes entered on the time log that is billable. Billable time is calculated using rate minimums and rounding set by the Reason. |
| 11 | Billable | Click to indicate that the time entered on the time log is billable. See the Marking Time Logs as Billable article for more information. |
| 12 | Work Performed | Work performed by the tech for the time log. Take advantage of our in-app AI tool to craft the perfect Work Performed by clicking the Reviize button. See the AI Powered: Rev.iize Tool article for more information about using our in-app AI tool. |
| 13 | Create New Time Log/Save | Click to create/save the time log with the information entered. |
These actions are available on the ticket Time Logs tab.
- Enter a new time log by clicking the New Time Log button in the upper portion of the tab. See the details provided above for more information.
- Take advantage of our in-app AI tool to craft the perfect Work Performed by clicking the Rev.iize button. See the AI Powered: Rev.iize Tool article for more information about using our in-app AI tool.
- View previously entered time logs in the lower portion of the tab. See the View Time Logs article for more information.