
Connecting an Office 365 Mailbox to Rev.io
Rev.io can monitor a dedicated inbox and automatically create tickets from incoming emails. There are two supported ways to connect an Office 365 mailbox to Rev.io:
- Microsoft Graph (Recommended): a modern, application-level connection using the Microsoft Graph API. Use this method for all new mailbox connections.
- IMAP (Fallback): a legacy connection method. Use this only if your organization cannot grant the required Graph permissions, or if a Graph connection needs to be rolled back and you need to keep the mailbox connected while that's resolved.
| NOTE: You will need access to the Azure Portal with admin privileges in order to complete this process. |
Method 1: Microsoft Graph (Recommended)
This is the recommended connection method for all Office 365 mailboxes. It uses an Azure app registration with Microsoft Graph's Mail.Read permission so Rev.io can read emails from your mailbox without requiring a password.
Step 1: Create an App Registration in Azure
- Sign in to the Azure Portal at portal.azure.com.
- Navigate to Microsoft Entra ID > App registrations > New registration.
- Give the app a name (e.g., "Rev.io Mailbox"), select your tenant type, and click Register.
- Once created, copy and save your Application (Client) ID and Directory (Tenant) ID. You'll need both in Step 4.
Step 2: Grant Mailbox Read Permission
- In your app registration, go to API permissions > Add a permission > Microsoft Graph.
- Select Application permissions and search for Mail.Read.
- Add the Mail.Read permission.
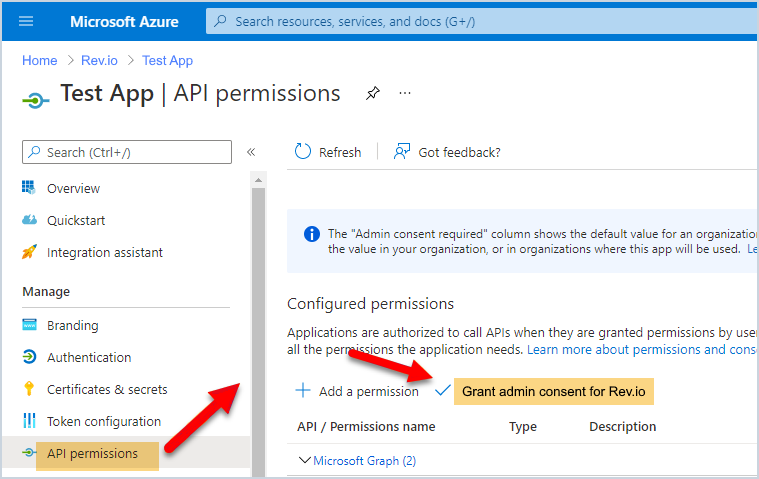
- Click Grant admin consent and confirm. The status should show a green checkmark.
Step 3: Create a Client Secret
- Go to Certificates & secrets > New client secret.
- Add a description and choose an expiration period, then click Add.
- Copy the Value immediately. This is your Client Secret and will not be displayed again after you leave this page.
| TIP: Set a calendar reminder before your Client Secret expires so you can rotate it without any interruption to your inbox monitoring. |
Step 4: Add the Mailbox in Rev.io
- In Rev.io, navigate to your mailbox settings and click Add New Mailbox.
- Enter the email address you're connecting.
- Set Provider to Office 365 and Authentication Type to App Registration (OAuth).
- Fill in the following credentials:
- Client ID from Step 1
- Client Secret from Step 3
- Tenant ID from Step 1
- Server Address/Port is not required for the Graph method. Leave blank.
- Click Create.
See the Add/Edit Support Inboxes article for more information.
Method 2: IMAP (Fallback)
Use IMAP only when Graph isn't an option; for example, if your organization's tenant policies block application-level Graph permissions, or if a Graph-based mailbox connection is having issues and needs to be rolled back while you troubleshoot. IMAP setup takes more steps and requires Exchange Online PowerShell access.
| IMPORTANT: If you're switching a mailbox from the Graph method to IMAP because the Graph connection is being rolled back, reuse the same app registration and Client Secret from Method 1 (Steps 1 and 3). You don't need to recreate them unless you no longer have the secret. If Graph access is being fully rolled back, remove the Mail.Read permission grant under API permissions so the app no longer holds standing Graph access it isn't using. |
The steps below assume you've already completed Method 1, Steps 1 and 3 (you have an app registration with a Client ID, Tenant ID, and Client Secret). If not, complete those two steps first, then continue here instead of Method 1, Step 2.
Step 1: Add the IMAP Permission to the App Registration
- In your app registration, go to API permissions > Add a permission > APIs my organization uses tab.
- Search for and select Office 365 Exchange Online.
- Click Application permissions (not Delegated permissions).
- Expand IMAP and add the IMAP.AccessAsApp permission.
- Click Grant admin consent and confirm. The status should show a green checkmark.
Step 2: Grant Exchange Mailbox Access to the Enterprise App
This part is done in Exchange Online PowerShell, not the Azure Portal. It links the app registration to the specific mailbox and turns on IMAP for that mailbox.
One-time setup
Install the Exchange Online management module:
Install-Module ExchangeOnlineManagement -Scope CurrentUser| NOTE: If your organization blocks the PowerShell Gallery, install from your internal package feed or ask your Exchange administrator to perform this setup. |
Each session
Connect to Exchange Online (repeat this each time you start a new PowerShell session):
Import-Module ExchangeOnlineManagement
Connect-ExchangeOnline -UserPrincipalName you@yourdomain.com| NOTE: This opens a browser for sign-in and MFA. You must be an Exchange Administrator or Global Administrator to run these commands. |
Grant mailbox access
New-ServicePrincipal -AppId <application-client-id> -ObjectId <enterprise-app-object-id>
Add-MailboxPermission -Identity "inbox@yourdomain.com" \
 -User <enterprise-app-object-id> \
-AccessRights FullAccess| NOTE: The enterprise app Object ID must come from the Enterprise Applications overview page in Microsoft Entra ID, not the Object ID on the App Registrations overview page for the same app. These are two different values, and using the wrong one is a common cause of authentication failures. If you're not sure which one you have, run Get-ServicePrincipal | fl after connecting to Exchange Online to look it up. |
Enable IMAP on the mailbox
Set-CASMailbox -Identity "inbox@yourdomain.com" -ImapEnabled $trueDisconnect
Disconnect-ExchangeOnline -Confirm:$falseStep 3: Add the Mailbox in Rev.io
- If it doesn’t already exist in Rev.io, navigate to your mailbox settings and click Add New Mailbox.
- Enter the email address you're connecting.
- Set Provider to Office 365 and Authentication Type to App Registration (OAuth).
- Fill in the following:
- Server Address: outlook.office365.com
- Port: 993
- Client ID from Method 1, Step 1.
- Client Secret from Method 1, Step 3.
- Tenant ID from Method 1, Step 1.
- Click Create.
See the Add/Edit Support Inboxes article for a full field reference.