
Customer List View
The Customer List View displays every customer in your database. A customer in Rev.io is the main record that phone numbers, email addresses, contacts, tickets, and other activity are created against. The Customer List View is accessible by clicking Customers in the sidebar.
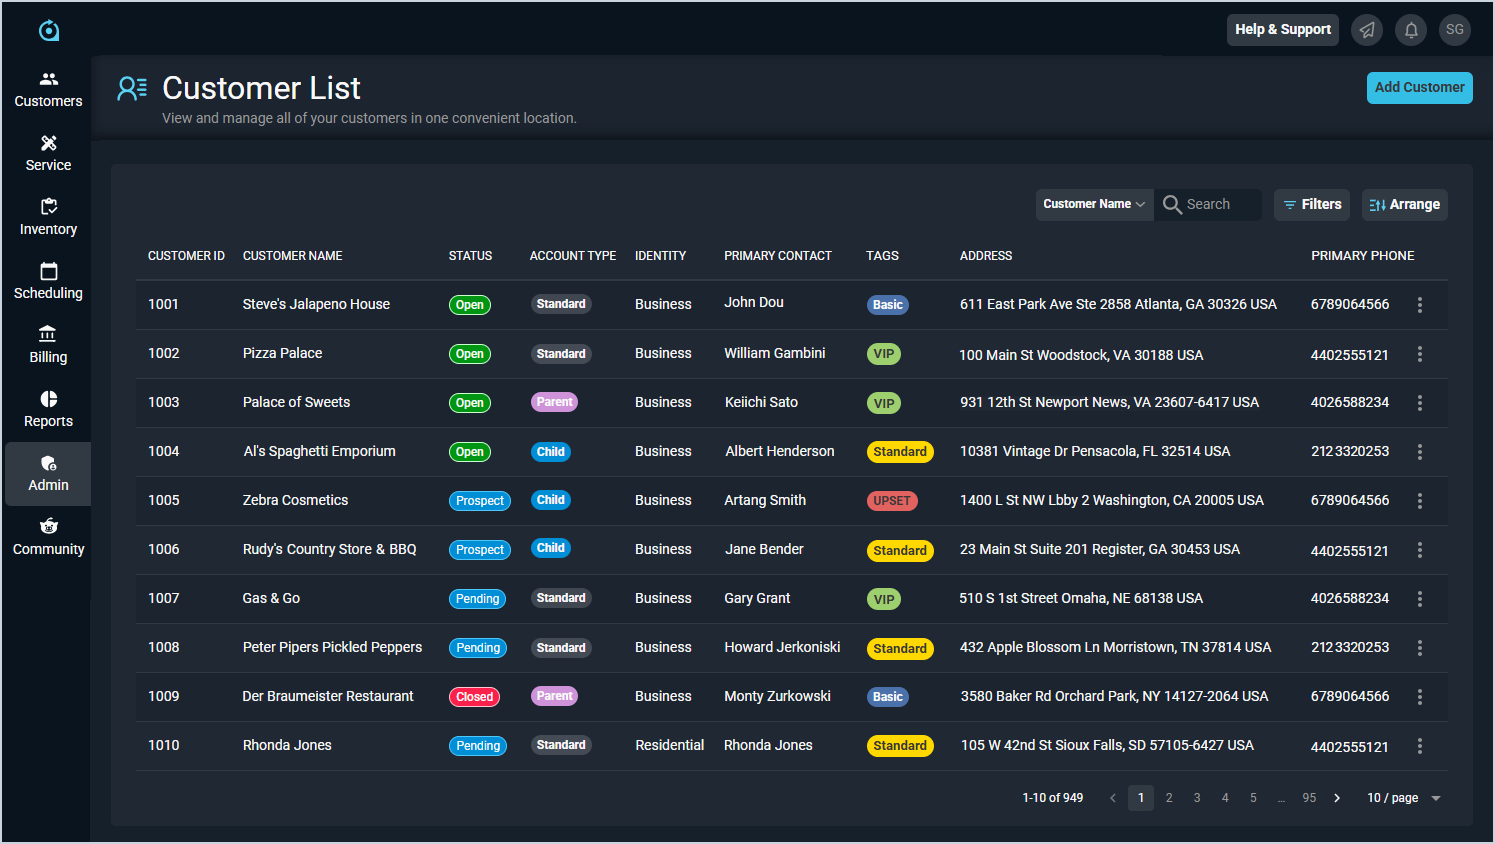
Each field on the Customer List view is defined below.
| No. | Label | Definition |
| 1 | Customer ID | Numerical identifier for the customer in your database. This field is unique to Rev.io and is NOT tied to Rev.io ID or Account Number in Rev.io Billing. |
| 2 | Customer Name | Name of the customer's company. |
| 3 | Status | Status of the customer. Status options include Open (green), Pending (blue), Prospect (blue), and Closed (red). |
| 4 | Account Type | Type of the customer account. Account Type options include Standard, Parent, and Child. |
| 5 | Identity | Identity of the customer. Identity options include Business and Residential. |
| 6 | Primary Contact | Main point of contact at the customer's company. |
| 7 | Tags | Tags associated with the customer account. |
| 8 | Address | Address for the customer. |
| 9 | Primary Phone | Primary phone number for the customer account. |
These actions are available on the Customer List view.
- Add a new customer by clicking the Add Customer button at the top of the screen. See the Add/Edit Customers article for more information.
- Search the customers displayed on this view by selecting a column from the dropdown above the grid and entering text in the Search field. The list view updates to display records matching your search in the column you selected.
- Filter the customers displayed on this view by clicking the Filter button above the grid and selecting options from the Account Type, Identity, Bill Profile, and/or Timeframe dropdowns. The list view updates to display only records matching your filters.
- Customize which columns display in the list view and the order in which they display by clicking the Arrange button and making the desired changes. See the Arrange Columns article for more information.
- Sort the results in the table by clicking the column label in the table header.
- View more details for the customer by clicking the links in the Customer ID/Customer Name columns, the row, or the ellipsis at the end of the row and selecting Info from the menu. Start with the Customer Profile: Header article for more information.
- Edit a customer by clicking the menu at the end of the row and selecting Edit from the menu options.