
View Contract: Details
The Contract Details screen allows you to view all relevant details for individual contracts and access several tabs to manage those contracts, including adding covered rate items and defining any terms, conditions, or comments. A 'contract' is an agreement to provide a specific level of service and support to your customer in exchange for a fee. Contracts in Rev.io PSA track both revenue and historical information, including tickets, parts and labor, and time logged.
| IMPORTANT: Make sure all information on the contract is correct before you set the Status to Active. At this time, you cannot make any changes to active contracts. |
Each field on the Contract Details screen is defined below.
| Information for the customer associated with the contract, details for the contract itself, and other options displays in the stage on the right side of the screen. See the View Contract: Stage article for more information. |
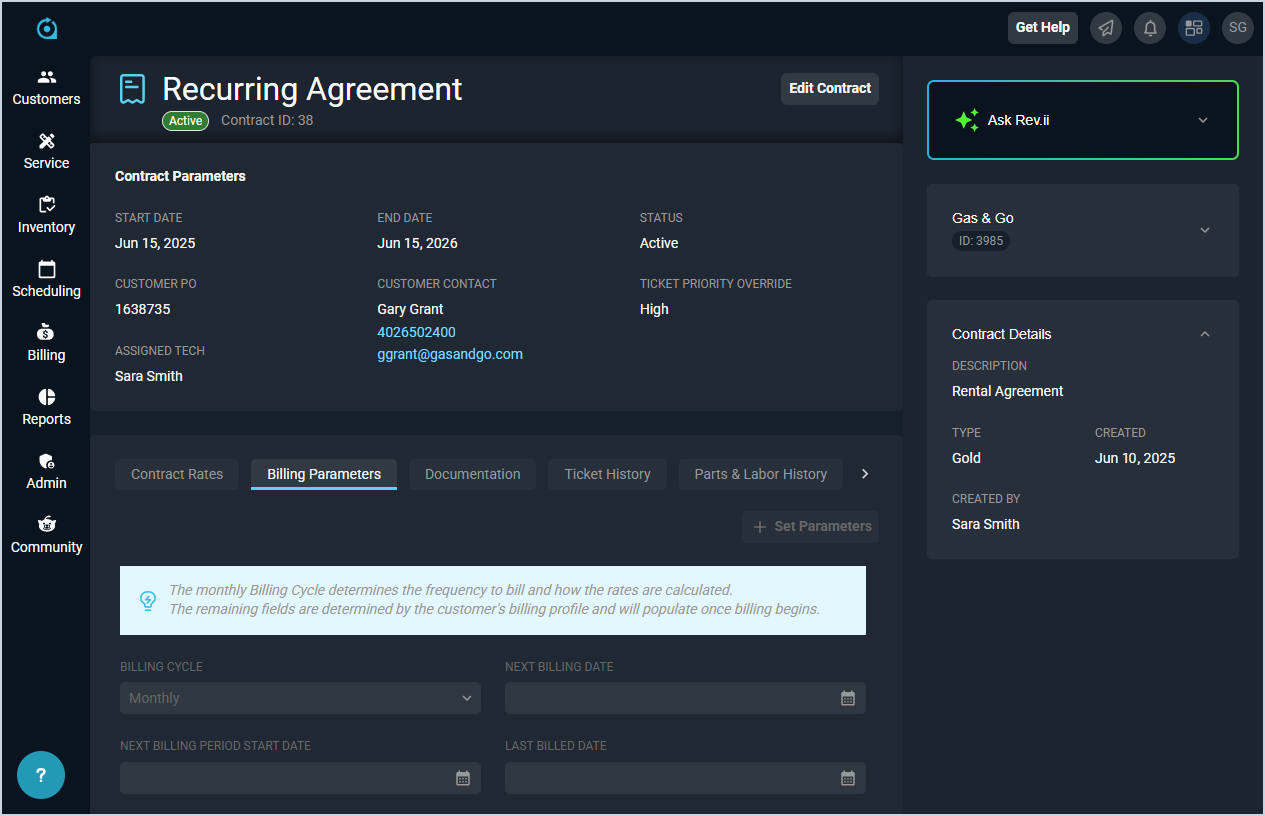
| No. | Label | Definition |
| 1 | <Basis> | Basis of the contract. Recurring Agreement is currently the only Basis option available. |
| 2 | <Status> | Status of the contract. NOTE: Once a contract is active, you will be unable to make any changes. Instead, you'll need to cancel the contract and create a new one if you need to modify it. |
| 3 | Contract ID | Numerical identifier for the contract in your database. |
| 4 | Start Date | Start date for the contract. |
| 5 | End Date | End date for the contract. |
| 6 | Status | Status of the contract. New contracts are always created with a Pending Status. Once you add covered rate items on the Contract Rates tab and any terms, conditions, or comments on the Billing Parameters tab, you can edit the contract and change the Status to Active. |
| 7 | Customer PO | Numerical identifier for the customer's PO on the contract. |
| 8 | Customer Contact | Full name and contact information for the contact on the customer's account. |
| 9 | Ticket Priority Override | Default Priority assigned to tickets created for the contract. |
| 10 | Assigned Tech | Default Tech Assigned on tickets created for the contract. |
These actions are available on the Contract Details screen.
- Edit the contract by clicking the Edit Contract button. See the Create/Edit Contracts article for more information.
- Access additional information about the contract, the associated customer, and other functions by clicking the Show the Stage icon in the top toolbar. See the View Contract: Stage article for more information.
- Make the contract Active by clicking the Edit Contract button and changing the Status from Pending to Active. Once a contract is active, the items on the Contract Rates tab are added to the Unposted tab on the customer profile. At this time, you cannot make any changes to active contracts.
Tabs on the Contract Details Screen
For information on the tabs at the bottom of the Contract Details screen, see the related articles.